Thursday 4 December 2014

EVALUATION


Throughout the first 10 weeks of hair, overall i am pleased with my first assessment. I have learnt many skills working on new hair styles and also following someone else instructions, doing this has made me more confident with my own ability to communicate and work with someone who i haven't chose but been assigned with.
At first i wasn't comfortable with the brief given as i thought it was going to be more advanced than i am in hair, but the practical hair lessons before the assessment built my confidence up and made me more than excited to sit my brief.
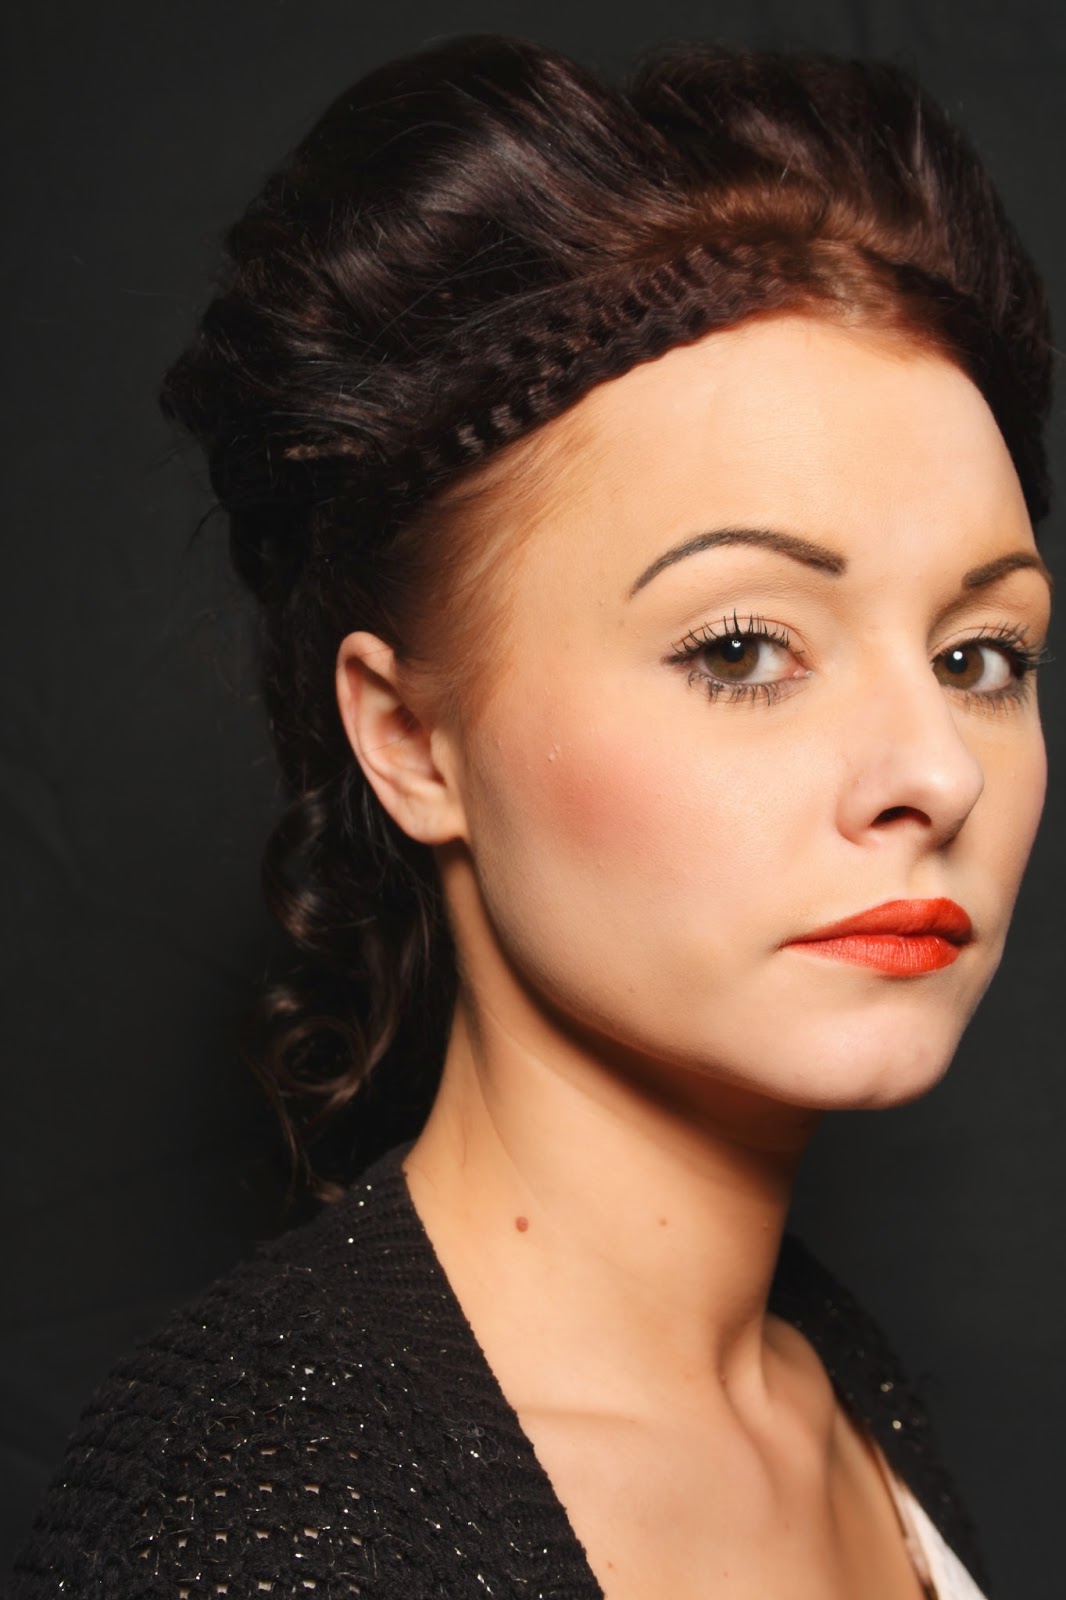
Unfortunately i did not attend many of helens lessons which causes problems with practicing mine and my partners design and actually made me a little less confident a day before the lesson. I reasonably know that is not a valid excuse as me and my partner could of committed to one another and actually put more effort to using free/ spare time to practise. Having said this, i would  say my time management wasn't brilliant, as i found that i spent more time on the make up blog and make up technical file. I wouldn’t say i liked one more than the other but i just enjoyed writing about the make up more, this made me fall behind and i would say my blog wasn’t my best but i know it will help me learn for next semester. Regarding the final assessment for Redhead and Royalty design, i feel that i have created a look with combines the traditional Elizabethan look with a twist of contemporary. I feel my partner justified my look and the way i wanted it to be portrayed. 

PEER ASSESSMENT - LAURA KENT DESIGN ME AS HAIRSTYLIST.


The following images above are my partners, Laura Kent design of and elizabethan contemporary look. 
During my assessment i felt extremely nervous as she had very little hair on one side which made it harder for me to make even. 
Laura shown me her design through email as neither of us had practiced it on each other. I felt confident with Laura's design as i had used padding previously and other products she wanted to use.
Disadvantages throughout the design were she had glue in hair bonds, which i was not aware of until the day of the assessment, this i were i would say i went wrong as i should of done a hair consultation before hand. Laura and i were both off during practice days but i wouldn't say that was a valid excuse. Personally we should of been more committed to one another and made more of an effort to meet, but as Laura commutes every day she has coaches to catch we was difficult for me to pull out extra time.  

PEER ASSESSMENT - MY DESIGN, LAURA ARTIST


MY DESIGN... i was extremely excited to see the outcome of my design, i chose this design as i thought it would look great as well as work great with my hair colour and length. 
Laura did brilliant considering she hadn't used fixing gel before, there were some faults which i did pick up on but i just left her to it. The only thing with me is i'm very impatient and if i see something being done wrong i have to say something, but i did stop my self this time as it was her assessment to see if she could follow my instructions. 
Outcome was wonderful as you can see by pictures and it came out exactly how i wanted it to as a first attempt for the actual design. 

FINAL DESIGN


Drawings of final look; 


Products 

  • Brush
  • Sectioning comb
  • Fixing Gel
  • Clips 
  • Comb 
  • Hair spray 
  • Crimpers 
  • Curlers 
  • PATIENCE.

Step by Step to final design 


  1. Brush through the hair, making sure you brush out any unnecessary knots.
  2. Crimp all hair from root to bottom. 
  3. Section the hair, removing the hair line into its own section.
  4. Gel down the hair from root to half way down the hair
  5. Apply clips to the end of the hair where the gel finishes for a more secure look. 
  6. Brush out the ends to make the hair bigger keep repeating this while backing until you have you satisfied big look. 
  7. Curl sections of the hairline and clip into place, you should carry this all around the hairline and where the clips are around the gelled hair. 
  8. Once done you should have a simular look to my drawings. 
  9. Finish off by hair spraying the hair down to give a more clean look. 


CONTEMPORARY ELIZABETHAN HAIR STYLES.


Absolutely love these designs, this had to be my favorite images of the contemporary look, i have so many ideas running through my head its crazy. 
The frizz technique has to my favorite part but as i have short hair  and personally i don't think i'll get the same effect as the model has here! Looking at these images i will defiantly incorporating the crimping effect. 
These images have influenced me on my own work and gave me different paths to go down for my final idea. Having said that, i would describe myself a very unorganised person i never stick to one idea i always like to change last minute, so these images have certainly made my head want to explode over thinking more into my design which you will see soon!

http://purpleport.com/portfolio/robb/image/239322/photographer/
http://www.pinterest.com/pin/495184921499639309/
http://www.pinterest.com/pin/5569686788909
http://toplowridersites.com/80s-crimped-hairstyles/53413/


3 FINAL DESIGNS


The above images are my 3 final designs, showing which ones i would like to go with, i know  some are rather difficult and would mean you need to be patient and with my hair being short i don't think they will look the way i want them too. The images could have more detail within the image, but i as they are only quick designs i just quick sketches.

ELIZABETHAN HAIR INFLUENCES


Elizabethan hair has always been more intriguing than i actually thought. If someone asked me my opinion on elizabethan hair i would say it would be the colour is the main attraction, it is strong, it makes her stand out and the word her i mean the "Queen" after researching into Elizabeth more i have become more fascinated by her hair and the women herself. 
Which brings me to the above images are influences of traditional elizabethan hair styles, these images have opened more doors/paths to go down before i get my end result i like.
http://www.hairfinder.com/hairstyles5/davis-upstyle12.htm

http://lasthairmodels.com/2013/01/08/elizabethan-hairstyle/elizabethan-hairstyle3/

http://lasthairmodels.com/2013/01/08/elizabethan-hairstyle/

Monday 1 December 2014

PADDING PRACTICING.

Padding. 

For you this you will need;


  • Padding, this is stuffed tights. (its best if you make your own)
  • Sectioning Comb
  • Clips 
Starters, you can prep the hair either by back combing or crimping, thats totally up to you but i crimped mine, this is only because it makes the hair look thicker. 

Section of the hair into a T parting and french plait behind the hair, this will be where the padding will sit.  
pierce the padding with gribs and then place on top of the plat turning the gribs against the plait do this on the front an back of padding. 

Once the padding is secure start bring the hair over the padding making sure you cover it all, you can use hair from the back if needs be. 

Following images will show my first attempt with padding, 
this lesson was great for me, as my partners design has padding procedures in it.


As this was my first attempt, i personally think it was a pretty good success! 

CRIMP USING CLIPS

Crimping with clips, Aka the figure of 8. 

Longest procedure to produce friz hair, well thats what i personally think. 
For this you will need;
  •  the big creased clips the ones with the rippled edges
  •  straighteners
step by step. 
  1. first you will need to brush the hair throughly making sure you have brushed out all knots. 
  2. section of the hair where you will like to friz 
  3. Once sectioned, take a small piece of hair and place the clip at the root. 
  4. Start moving the hair in and out of the clip, basically doing a figure of 8 around the clip
  5. once finished clip the end piece making sure its secure. 
  6. apply heat to the hair using straighteners. 
  7. Wait to cool down, this will give you time to prep another one. 
  8. Remove and you will see something like the image below. 


After you whole section what you want to friz looks like this, you can brush the hair and it will start to look like the image below. 
This process it great for making hair really frizzy, but you have to have a lot of time on your hands unless you know exactly what you are doing!
Eventually i will use this process in my future work, which makes this lesson beneficial for me.  

CURLS AND CRIMP

Curls and Crimp. 


Well... Personally, i think this lesson was fab! i enjoyed messing around with my heads hair. 
First of all, Lottie told us to section off the hair into two sides, so right down the middle.
One side for crimping and the other for curls. 
The following images are shown below of me producing crimp and curl work.


This lesson influenced me to be more confident with my own work and shown me that if i try i can produce actual good work! 
The lesson was one of the lessons i most enjoyed but i did find the curling does get boring after a while compared to the crimping. 


Curling the hair; while curling the hair you had to make sure you was twisting the curlers the right way with the hair instead of against the hair, otherwise you will end up with a crease at the end of the hair. 
Crimping the hair; crimping is pretty easy, grab a section making sure to start at the root pressing down moving the crimps down a bit each time. The reason while i like crimping so much is it can produce big hair after being brushed and backcombed. 
This lesson helped me with techniques to use for my final designer.

RIBBON AND PEARLS.

Ribbon an pearls, during this lesson i was not in, i was given feedback from another student who attended this lesson. 
From the feedback given, i felt confident enough to understand how to apply ribbon within hair and also adding other objects such as pearls. 
Disadvantages which occurred from me not attending this lesson is i do not have images of me producing the ribbon or pearl look. 

Plaiting with ribbon could be complicated but as i have grew up with a mother who is a hair dresser, i do already no basic hair proceedures which is a bonus, but does not accept the fact i missed a lesson. 
Missing this lesson made me fall behind on work and become more stressed within the hair side of the course. 
Throughout my next semester i do hope my attendance approves so my work becomes more valid and updated.  

Sunday 26 October 2014

PLAITS AND BUNS.

FIRST LESSON


During our first we were shown how to wash hair properly and explained what we will be doing in the following lessons. I was the model to washing the hair, so i got to feel how the client felt, i then had my hair blasted with the blowdryer. 
Why? you'll say why is this relevant but this will help me in future references. 


  • During our Second lesson with Lottie, we was shown how to french plait, normal plait, and a bun without the donut. 
The following images will show some work i produced during her lesson.       


Step by step - how to do a fishtail plait

  1. Divide your into two sections. 
  2. Take a small piece from the outside of one section and bring it into the middle of the other section. 
  3. Repeat this for the opposite side an pull tight.
  4. keep doing the same until the bottom. 
  5. depending if you want a tight one or not, keeping pulling it tight. 
  6. Most fishtail Plaits look better with a teased look. 


Step by step - how to do a french plait


  1. Section of 3 sections of hair and begin to plait. 
  2. Once rotated one, Grab an extra piece of hair on the left side an bring to the left section of the plait. 
  3. Repeat for the right.
  4. then cross them over while repeating stage 2 and 3. 
  5. Carry on doing this until you run out of hair. 
  6. Carry the braid on with a normal plait for the bottom. 


Step by step ways - how to produce Bun 

  1. Start of with an original pony tail.
  2. Divide the hair in to 4 separate Sections.
  3. back comb the hair at the root of the hair tie.
  4. Fold over the hair and pin each side.
  5. Repeat for each section.
  6. Once all pinned get some smaller pins and gently move the hair around covering gaps and secure with pins. 


Step by step- How to produce a Plait

  1. Divide your hair into 3 sections. 
  2. Gently cross over the right section on to the middle section. 
  3. repeat with the left section. 
  4. Keep bring each side in the middle section swapping side each time. 
  5. eventually you should end up with a plait.